Share a Looker Studio Report and Data Source
Learn when and how to share Looker Studio reports and data sources. Step-by-step tutorials, permissions tips, and best practices for teams and clients.
You’ve created your report, it’s probably finalized, and the next step is to share it with your team, your management, or your clients. Looker Studio offers several sharing options, adapted to different use cases, to make both your reports and your data sources collaborative.
In this guide, we’ll look at when, how, and why to use Looker Studio sharing features so you can give the right access to the right people, without confusion or broken dashboards.
Prerequisites & reminder
Before going further, keep in mind two key concepts that explain most sharing issues in Looker Studio.
First, data visibility in a report depends on the credential mode: depending on whether the source uses the owner’s credentials or the viewer’s credentials, users will (or won’t) be able to see the data. Second, a data source can be embedded in a report or reusable across multiple reports, and this difference changes how sharing works and what permissions are needed. For a deeper dive, check the dedicated articles: Owner vs Viewer credentials and Embedded vs Reusable data sources.
Two ways to share in Looker Studio: report vs data source
Looker Studio lets you share at two levels:
- At the report level
A report is what people open, explore, and interact with: pages, charts, filters, and visualizations. Sharing a report gives access to the dashboard experience, either to view it or edit it depending on the role.
In short: report sharing = sharing insights.
- At the data source level
A data source is what powers one or more reports: connections, fields, calculated metrics, and schema. Sharing a data source gives access to the data structure behind the dashboard, so others can reuse it or help maintain it.
In short: data source sharing = sharing the building blocks.
Why this distinction matters
A common mistake is thinking that sharing the report automatically lets others build from the same data. In reality:
- Sharing a report controls who can see or edit the dashboard.
- Sharing a data source controls who can reuse or edit the dataset powering dashboards.

Share a Looker Studio report
Report sharing is the default move when your audience needs the insights, not the underlying data model. Common marketing use cases:
- Clients need a live dashboard to monitor campaign performance, SEO visibility, or paid media pacing.
- Managers need visibility for weekly or monthly KPI check-ins.
- Sales or Customer Success teams need access to a simplified view of leads, pipeline, or acquisition performance.
- Your internal team needs to co-edit layout or storytelling before a review meeting.
How to share a report in Looker Studio
Sharing with specific people
Use this method when you know exactly who should access the dashboard (teammates, managers, clients).
Steps
From report interface:
- Click Share (top right).
- In “Share with people and groups”, add email addresses or Google Groups.
- Assign a role:
- Viewer → can open and interact with the report (filters, date ranges, etc.).
- Editor → can modify the report (charts, pages, layout, settings).
- Uncheck "Notify people" to avoid notifying recipients.
- Click Send to confirm
This method is ideal for internal collaboration or client-specific access, especially when you want to control exactly who can view or edit the dashboard. Since access is restricted to the people or groups you explicitly add, you keep your report private and avoid unintended sharing outside your intended audience.
Sharing with a link
Use this method when you want to distribute the report quickly, especially to a wider audience (a client team, leadership, or multiple stakeholders).
Steps
From Looker Studio report interface:
- Click Share in the report.
- In Link settings, open the dropdown.
- Choose the right link access level:
- Restricted → only invited people can open the report.
- Workspace → anyone in company with the link can view
- Unlisted → anyone on the Internet with the link can view
- Public → anyone on the Internet with the link can find and view
- Copy the link and send it.

Share a Looker Studio data source
You share a data source when the goal is collaboration on the data, not just reading a dashboard.
Common marketing use cases:
- Your team is building multiple dashboards (SEO report, Paid Ads report, CRM report) and needs one consistent “source of truth” for KPIs.
- A teammate needs to create their own report from your curated dataset (example: a regional marketing manager building a local view).
- You want consistent definitions across clients (same CAC formula, same MQL definition, same attribution logic).
- You’re handing over reporting ownership and the next person needs to maintain fields and calculations.
How to share a data source in Looker Studio
- Go to Looker Studio home.
- Click Data sources.
- Locate the data source you want to share.
- Click More (⋮) > Share.
- Add email addresses or a Google Group.
- Choose a role:
- Viewer → can use the source in reports.
- Editor → can modify fields, calculations, schema.
- Confirm sharing by clicking Done.
Understanding data visibility & edit rights
Sharing in Looker Studio has two layers:
- Report permissions (Viewer / Editor)
- Data visibility (controlled by data credentials)
This is why two people with the same Viewer role might not see the same thing.
Data visibility when you share a report
Sharing a report gives access to the dashboard interface, but data visibility depends on the data source’s credential mode:
- With Owner’s credentials, viewers/editors see data through the owner’s access.
- With Viewer’s credentials, each person must have their own access to the underlying dataset, otherwise charts may be empty or show errors.
Edit rights and embedded data sources
Editors can modify the report, but Edit rights don’t override data access rules.
Also, if your report uses an embedded data source, anyone who can edit the report can also edit that embedded data source from inside the report (fields, calculations, connection).
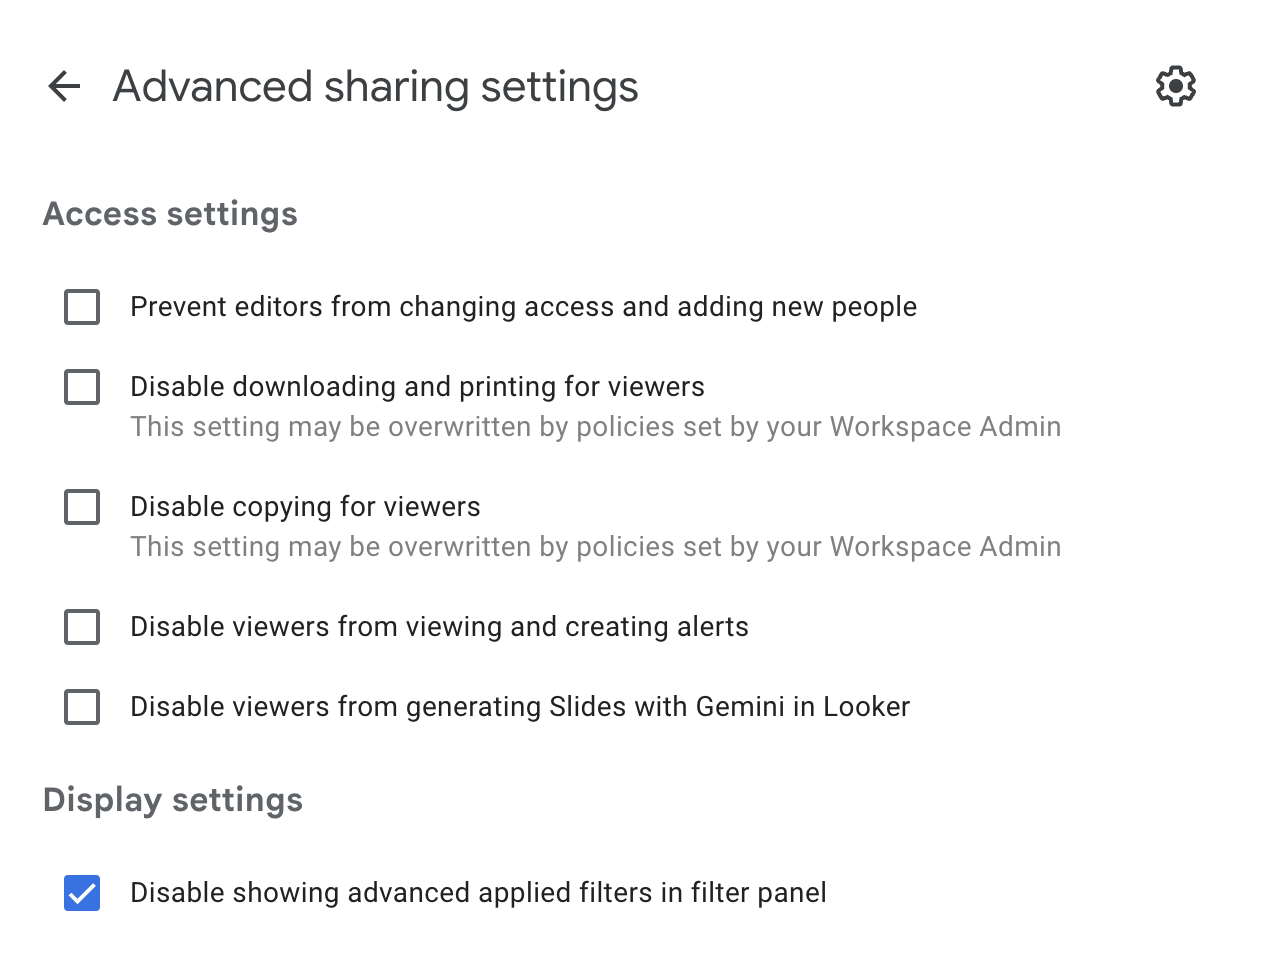
Advanced sharing options
You can access additional sharing settings by clicking the gear icon in the top-right corner of the sharing window.

Which method should you choose?
Use this quick decision guide:
Best practices
- Use Google Groups instead of individual emails: Easier to manage when people join or leave teams.
- Name reports and sources clearly
- [Client] – Acquisition Dashboard
- [Core] – GA4 + GSC Master Source
- Limit Editors on data sources: Too many Editors can unintentionally break shared KPIs across dashboards.
- Test before sharing externally: Open the report as a Viewer (or ask a colleague) to confirm everything displays properly.
- Plan ownership handovers: Transfer ownership and re-check access anytime a project changes hands.
FAQ & troubleshooting
- If I share the report, can someone edit it?
Only if you assign them the Editor role.
- Do I need to share the data source too?
Only if they need to reuse or edit the data source.
- Can I share a data source without sharing the report?
Yes, this is common when someone needs to build their own dashboard from your dataset.
- Are there other sharing workflows?
Yes. Beyond direct sharing and links, Looker Studio also lets you schedule email deliveries, export reports as PDFs, and embed reports in a website or internal portal.
- Charts are empty or show access errors
Usually a credentials or underlying data permission issue.
- Someone can view the report but can’t reuse the data
They likely only have report access. Share the data source explicitly.
- A KPI/field was changed and multiple dashboards broke
Reduce Data Source Editors and duplicate the source before major changes.
In summary
Sharing in Looker Studio becomes straightforward once you clearly separate dashboard access from data access. Share a report when your audience needs to read insights and make decisions, and share a data source when collaborators need to reuse or maintain the data model behind your dashboards. By keeping credential mode and data source type in mind, and by choosing the right sharing level for each audience, you avoid empty charts, access errors, and unintended exposure. In short, share reports to distribute insights, share data sources to collaborate on data, and always align permissions with the real outcome you expect from your users.
